
Advertisements
Fuse box diagram (fuse layout), location, and assignment of fuses Skoda Kodiaq (2016, 2017, 2018, 2019).
Checking and Replacing Fuses
Individual electrical circuits are protected by fuses.
- Before replacing a fuse, switch off the ignition and the appropriate consumer.
- Find out which fuse belongs to the component that is not operating.
- Defect fuses can be detected by their melted metal strips. Replace the defect fuse by a new fuse of the same ampere number.
- If a new fuse burns through again, consult a specialist immediately.
Notice
- Never “repair” fuses and also do not replace them with a fuse of a higher amperage – risk of fire! This may also cause damage at another part of the electrical system.
- Have the electrical system checked as quickly as possible by a ŠKODA specialist garage if a newly inserted fuse blows again after a short time.
- We recommend always carrying replacement fuses in the vehicle.
Passenger Compartment Fuse Box
LHD: The fuse box is located on the driver side behind the storage compartment.
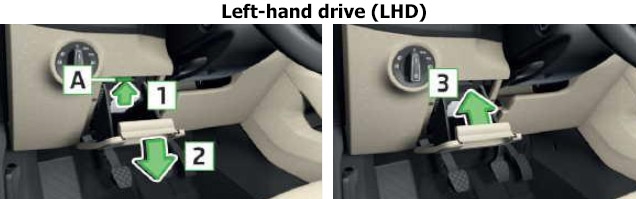
- Open the storage box on the driver’s side.
- Press the latch A in direction of arrow 1, open the compartment in the direction of arrow 2.
- Remove the plastic clip under the cover of the fuse box in the engine compartment. Use the clip to pull out the faulty fuse and then insert a new fuse.
- Stow the clip back in the original position.
- Close the compartment by pressing in arrow direction 3 until you hear it click.
RHD: The fuse box is located on the passenger side behind the storage compartment.
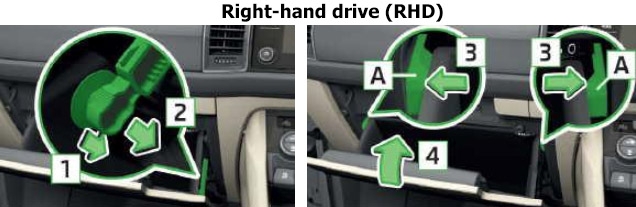
- Open the storage compartment on the front passenger side.
- Unlock the brake rod in the direction of arrow 1 and remove it in the direction of arrow 2.
- Unlock the stop pad A in the direction of arrow 3 and the compartment folds down in the direction of arrow 4.
- Remove the plastic clip under the cover of the fuse box in the engine compartment. Use the clip to pull out the faulty fuse and then insert a new fuse.
Fold back the storage compartment:
- Raise the storage compartment in the direction of arrow 4.
- Overcome resistance of stop pad A.
- Insert the brake rod against the direction of arrow 2 and lock against the direction of arrow 1.
- The compartment closes (increased force is required to close it) until it clicks into place.
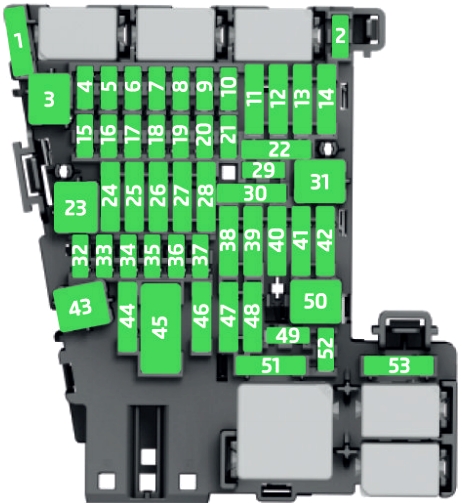
Fuse Diagram
| № | Fused Function |
|---|---|
| 1 | Not assigned |
| 2 | Not assigned |
| 3 | Not assigned |
| 4 | Heated steering wheel |
| 5 | Databus |
| 6 | Automatic gearbox |
| 7 | Air conditioning, receiver for the remote control for the auxiliary heating, heated rear window, heated windscreen, rear air conditioning system |
| 8 | Light switch, rain sensor, parking brake, ambient lighting, sensor of the alarm system, headlight |
| 9 | Operating lever underneath the steering wheel |
| 10 | Infotainment screen |
| 11 | Light - left |
| 12 | Infotainment, ExBoxM2 (applies to South Korea) |
| 13 | Left side belt tensioner |
| 14 | Air blower for air conditioning,heating |
| 15 | Electric steering lock |
| 16 | USB port, diagnostic connector, Phonebox |
| 17 | Instrument cluster, emergency call |
| 18 | Reversing camera |
| 19 | KESSY |
| 20 | SCR |
| 21 | All-wheel drive |
| 22 | Towing hitch |
| 23 | Panoramic slide / tilt sunroof |
| 24 | Light - right |
| 25 | Central locking- front and rear door left, power window - left, exterior mirrors left - heating, fold-in function, setting the mirror surface |
| 26 | Heated front seats |
| 27 | Interior lighting |
| 28 | Trailer device - electrical outlet |
| 29 | Not assigned |
| 30 | Shock absorber setting |
| 31 | Not assigned |
| 32 | Parking aid (Park Assist) |
| 33 | airbag |
| 34 | Air conditioning, reversing light switch, mirror with automatic dimming, seat heating, parking brake, light switches, bar with switches, electric auxiliary heating |
| 35 | Diagnostic connector, camera, radar |
| 36 | AFS headlights - right |
| 37 | AFS headlights - left |
| 38 | Trailer device - electrical outlet |
| 39 | Central locking- front and rear door right, power window - right, exterior mirrors right - heating, fold-in function, setting the mirror surface |
| 40 | 12-volt power outlets |
| 41 | Right side belt tensioner |
| 42 | Luggage compartment cover lock, headlight washers, front and rear window washer |
| 43 | Music amplifier |
| 44 | Trailer device - electrical outlet |
| 45 | Electrical operation of driver's seat |
| 46 | 230-Volt power socket |
| 47 | Rear window wiper |
| 48 | "Blind spot" detection |
| 49 | Engine starting, clutch pedal switch |
| 50 | Opening the boot lid |
| 51 | Heating of the rear seats |
| 52 | Heated front seats |
| 53 | Heated rear window |
Advertisements
Engine Compartment Fuse Box
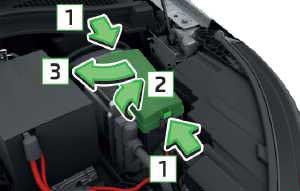
- Press together the lock buttons of the cover simultaneously in the direction of arrow 1 and remove the cover in the direction of arrow 2.
- Remove the cover in the direction of the arrow 3.
- Remove the plastic clip under the cover of the fuse box. Use the clip to pull the fuse out, then insert a new fuse.
- Replace the clamp in the original position.
- Replace the cover, push the lock buttons of the cover together, and lock.
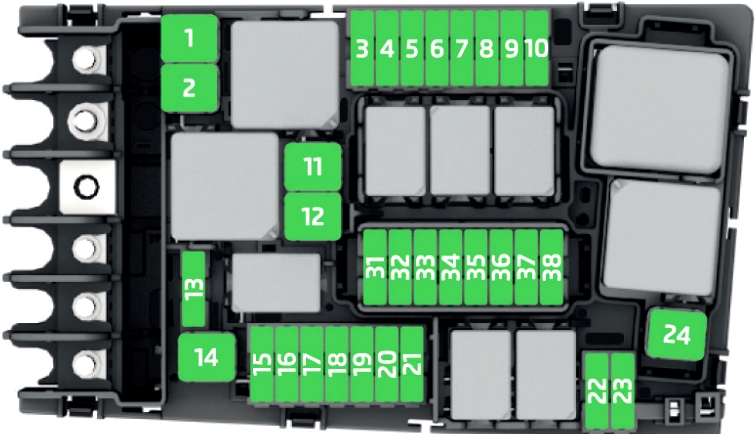
| № | Fused Function |
|---|---|
| 1 | ESC, parking brake |
| 2 | ESC |
| 3 | Engine control system |
| 4 | Radiator fan, control valve for fuel pressure, electric auxiliary heating, engine components |
| 5 | Ignition, fuel pump, oil level and oil temperature sensor, engine components |
| 6 | Brake sensor |
| 7 | Coolant pump, exhaust flap, engine components |
| 8 | Lambda probe |
| 9 | Coolant pump, ignition, preheating unit, air flow meter, engine components |
| 10 | Fuel pump |
| 11 | Additional electrical heating, heated windscreen |
| 12 | Electrical auxiliary heating system |
| 13 | Automatic gearbox |
| 14 | Not assigned |
| 15 | Horn |
| 16 | Ignition |
| 17 | ESC, engine control unit, main relay coil |
| 18 | Databus, battery data module |
| 19 | Windscreen wipers |
| 20 | Anti-theft alarm |
| 21 | Not assigned |
| 22 | Engine control system |
| 23 | Starter |
| 24 | Electrical auxiliary heating system |
| 31 | Not assigned |
| 32 | Not assigned |
| 33 | SCR |
| 34 | Not assigned |
| 35 | Not assigned |
| 36 | Not assigned |
| 37 | Aux. heating |
| 38 | Not assigned |
Advertisements