Advertisements
Fuse box diagram (fuse layout), location, and assignment of fuses Peugeot 207 (2006, 2007, 2008, 2009, 2010, 2011, 2012, 2013, 2014).
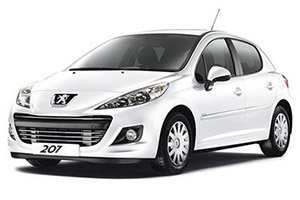
Checking and Replacing Fuses
Your vehicle’s electrical system is protected from overloading by fuses. If any lights, accessories, or controls in the vehicle do not work, inspect the appropriate circuit protector. If a fuse has blown, the inside element will be melted.
Before changing a fuse, it is necessary to:
- Immobilise the vehicle and switch off the ignition,
- Switch off all electrical consumers,
- Identify the failed fuse using the fuse allocation tables and diagrams in the following pages,
- Identify and correct the cause of the problem.
When replacing a fuse, you must always:
- Use the special tweezer to extract the fuse from its holder and check the condition of its element,
- Replace a failed fuse by one of the same rating (same colour); the use of a different rating fuse could cause a fault (risk of fire).
If the same fuse blows again, avoid using that system and have the vehicle’s electrical system checked by PEUGEOT dealer or a qualified workshop as soon as possible.
Notice
- Never use a fuse of a higher or lower amperage rating than that specified. This could damage the electrical system or cause a fire.
- Never replace a broken fuse with anything other than a new fuse (such as wire, foil, etc). Use always an intact fuse of the same color.
- Your vehicle’s electrical system is designed to operate with standard or optional equipment. Before installing other electrical equipment or accessories on your vehicle, contact a PEUGEOT dealer or a qualified workshop.
Passenger Compartment Fuse Box
The fusebox is placed in the lower dashboard (left-hand side).
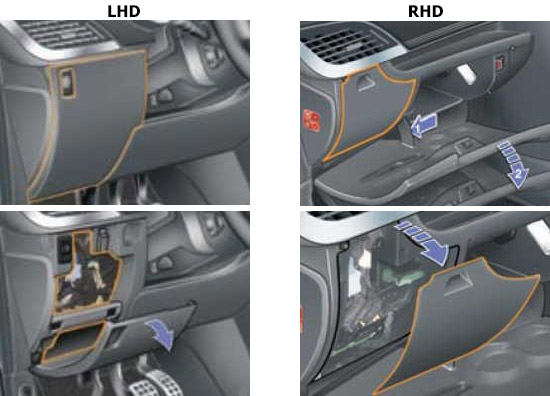
LHD:
- unclip the cover pulling at the top,
- remove the cover completely.
RHD:
- open the glove box lid,
- push the opening guide to the left to go beyond the first notch,
- open the glove box lid fully,
- unclip the fusebox cover pulling at the top,
- remove the cover completely,
- To close the glove box, take care to push the opening guide back to the left to go beyond the first notch.
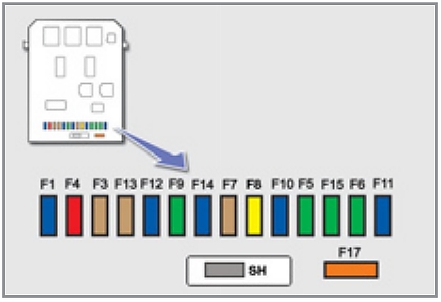
| № | A | Functions |
|---|---|---|
| G39 | 20 | Hi-Fi amplifier |
| G40 | 20 | Seats heated driver and front passenger |
| 1 | 15 | Rear wiper |
| 2 | - | Not used |
| 3 | 5 | Airbag and pre-tensioner control unit |
| 4 | 10 | Clutch pedal switch, diagnostic socket, electrochromatic rear view mirror, air conditioning, steering wheel angle sensor, particle emission filter pump (Diesel) |
| 5 | 30 | Electric windows, rear one-touch electric windows, panoramic sunroof blind (SW) |
| 6 | 30 | Front one-touch electric windows, folding door mirrors supply |
| 7 | 5 | Front and rear courtesy lamps, map reading lamps, sun visor lighting, glove box lighting |
| 8 | 20 | Audio equipment, audio/telephone, multifunction screen, clock, steering mounted controls, trailer fuse box. |
| 9 | 30 | Front 12 V socket, rear 12 V socket (SW) |
| 10 | 15 | Alarm siren, alarm control unit |
| 11 | 15 | Diagnostic socket, low current ignition switch, automatic gearbox control unit |
| 12 | 15 | Rain/sunshine sensor, amplifi er, trailer fusebox, driving school module |
| 13 | 5 | Engine fusebox, ABS relay, dual-function brake switch |
| 14 | 15 | Instrument panel, seat belt warning lamps panel, headlamp adjustment, air conditioning, Bluetooth system, rear parking sensors control unit, airbags |
| 15 | 30 | Locking and deadlocking |
| 17 | 40 | Rear screen and door mirrors demist/defrost |
| SH | - | PARC shunt |
Advertisements
Engine Compartment Fuse Box
The fuse box is placed in the engine compartment, near the battery (left-hand side).
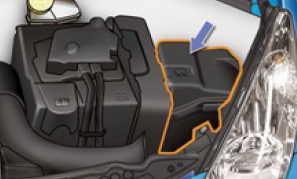
Access to the fuses:
- Unclip the cover.
- Replace the fuse.
- When you have finished, carefully close the cover carefully to ensure the correct sealing of the fusebox.
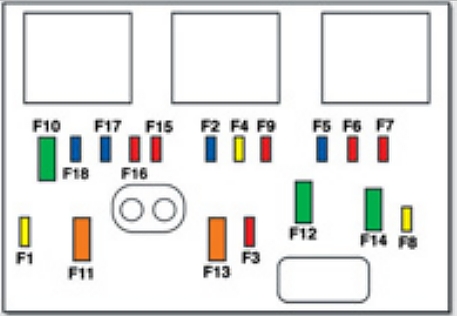
| № | A | Functions |
|---|---|---|
| 1 | 20 | Engine control unit and fan assembly control relay supply, timing and canister electrovalves (1.6 l 16V THP), air fl ow sensor (Diesel), injection pump (Diesel), water in diesel sensor (Diesel), EGR electrovalves, air heating (Diesel) |
| 2 | 15 | Horn |
| 3 | 10 | Front and rear screenwash |
| 4 | 20 | Headlamp wash |
| 5 | 15 | Fuel pump (petrol), Turbo electrovalves (1.6l 16V THP) |
| 6 | 10 | Vehicle speed sensor, automatic gearbox |
| 7 | 10 | Electric power steering, switching and protection unit (Diesel) |
| 8 | 20 (<-09.2007) 25 (10.2007->) | Starter motor control |
| 9 | 10 | ABS/ESP control unit, brake pedal switch |
| 10 | 30 | Engine control unit actuators (petrol: ignition coils, electrovalves, oxygen sensors, injectors, heaters, electronic thermostat) (Diesel: electrovalves, heaters) |
| 11 | 40 | Air conditioning blower |
| 12 | 30 | Windscreen wipers Low/High speed |
| 13 | 40 | Built-in systems interface supply (ignition positive) |
| 14 | 30 | Diesel heater (Diesel) |
| 15 | 10 | Left main beam headlamp |
| 16 | 10 | Right main beam headlamp |
| 17 | 15 | Left dipped beam headlamp |
| 18 | 15 | Right dipped beam headlamp |
| MF1 | 70 | Fan assembly |
| MF2 | 20/30 | ABS/ESP pump |
| MF3 | 20/30 | ABS/ESP electrovalves |
| MF4 | 60 | Built-in systems interface supply |
| MF5 | 60 | Built-in systems interface supply |
| MF6 | 30 | Additional fan assembly (1.6l 16V THP) |
| MF7 | 80 | Passenger compartment fusebox |
| MF8 | 30 | "2 Tronic" gearbox control unit |
| MF9 | 80 | Heating unit (Diesel) |
| MF10 | 80 | Electric power steering |
| MF11 | 40 | Valvetronic electric motor (1.6l 16V THP) |
* The maxi-fuses provide additional protection for the electrical systems. All work on the maxi-fuses must be carried out by a PEUGEOT dealer or a qualified workshop.
Advertisements
