
Advertisements
Fuse box diagram (fuse layout), location, and assignment of fuses Land Rover Discovery 2 / Mk2 (L318) (1998, 1999, 2000, 2001, 2002, 2003, 2004, 2005).
Checking and Replacing Fuses
A fuse is an element for protecting the electrical system. A fuse will trip (i.e. it will blow) in the event of a failure or improper interventions in the electrical system.
If an electrical device is not working, check whether the respective fuse is blown. Look at the silver-colored band inside the fuse. If the band is broken or melted, replace the fuse. Check those fuses first that protect the failed component, but check all the fuses before deciding that a blown fuse is not the cause. Replace any blown fuses with another with the same amperage (same color) and check the component’s operation.
Notice
- Never replace a broken fuse with anything other than a new fuse. Always use a fuse of the same color.
- Fit approved replacement fuses of the same rating and type, or fuses of a matching specification. Using an incorrect fuse may result in damage to the vehicle’s electrical system and can result in a fire.
- Always switch off the ignition system and the affected electrical circuit before replacing a fuse. Failure to do so could cause damage to the vehicle.
- If the replacement fuse blows after fitment, the system should be checked by a retailer/authorised repairer. Further damage could be caused to the vehicle if ignored.
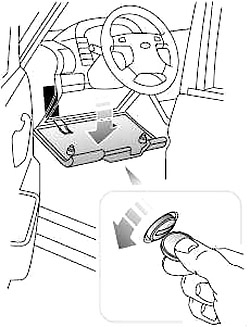
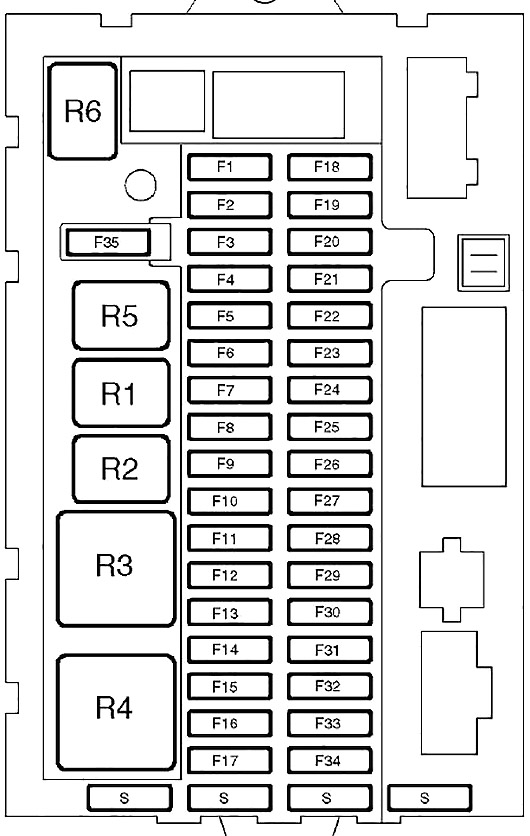
Instrument Panel Fuse Box
The main fuse box is fitted below and to one side of the steering column. Turn the two clamps on the panel counterclockwise and lower the panel.
| № | A | Circuit protected |
|---|---|---|
| 1 | 25 | Central door locking |
| 2 | 10 | Fuel flap release |
| 3 | 10 | Instrument pack |
| Switch illumination | ||
| 4 | 10 | Fog guard lights - rear |
| 5 | 10 | Headlight high beam - LH |
| 6 | 25 | Air conditioning blower - rear |
| 7 | 30 | Heater blower - front |
| 8 | 30 | Heated rear window |
| Heated mirrors | ||
| 9 | 10 | Headlight normal beam - LH |
| 10 | 10 | Headlight normal beam - RH |
| 11 | 10 | Side & tail lights - LH |
| Number plate light | ||
| Switch illumination | ||
| Trailer socket | ||
| 12 | 30 | Sunroof |
| 13 | 30 | Electric windows - rear |
| 14 | 20 | Ignition coils |
| 15 | 20 | Cigar lighter |
| Interior lights | ||
| Seat heaters | ||
| Vanity mirror illumination | ||
| 16 | 15 | Clock |
| Radio | ||
| Park distance control | ||
| Rear head phones | ||
| 17 | 15 | Radio amplifier |
| Speakers | ||
| 18 | 15 | Wiper motor - rear |
| 19 | 15 | Wiper motor - front |
| Screen washer - front | ||
| 20 | 15 | Interior lights |
| Clock/radio memory | ||
| Engine remobilisation | ||
| Compact disc player | ||
| Key i/lock | ||
| Diagnostics | ||
| 21 | 15 | Transfer box |
| Alarm audible warning | ||
| Shift i/lock | ||
| 22 | 10 | Headlight high beam - RH |
| 23 | 10 | Starter motor |
| 24 | 10 | Alternator |
| Automatic transmission | ||
| Engine management | ||
| 25 | 15 | Brake lights |
| Reverse lights | ||
| 26 | 10 | Auxiliary circuits relays |
| 27 | 10 | Instruments |
| Hill descent control | ||
| 28 | 10 | Self levelling suspension |
| Anti-lock braking | ||
| 29 | 10 | Active cornering enhancement (ACE) |
| 30 | 20 | Cruise control |
| Electric mirrors | ||
| Screen washer - rear | ||
| 31 | 10 | Air conditioning blower - front |
| 32 | 25 | Accessory socke |
| 33 | 10 | Side & tail lights - RH |
| Radio | ||
| Trailer socket | ||
| Switch illumination | ||
| 34 | 30 | Electric windows - front |
| 35 | 10 | Airbag SRS |
Advertisements
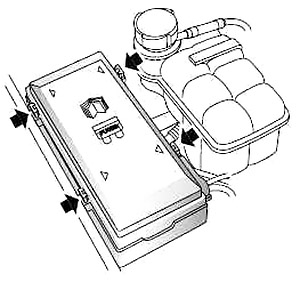
Engine Compartment Fuse Box
A second fuse box is located on the right side of the engine compartment adjacent to the coolant reservoir. Press all four latches in the direction of the arrows shown on the illustration to release the fuse box cover.
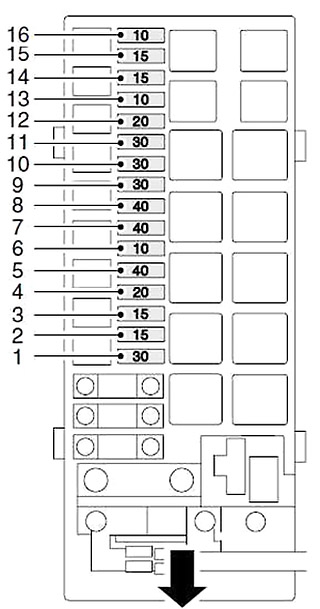
| № | A | Circuit protected |
|---|---|---|
| 1 | 30 | Fuel injectors |
| 2 | 15 | Engine management system |
| 3 | 15 | Front fog lights |
| 4 | 20 | Headlight washers |
| 5 | 40 | Cooling fans |
| 6 | 10 | Air conditioning |
| 7 | 40 | Heated front screen - LH |
| 8 | 40 | Heated front screen - RH |
| 9 | 30 | Trailer lights |
| 10 | 30 | Fuel pump |
| 11 | 30 | ABS valve |
| 12 | 20 | Automatic gearbox |
| 13 | 10 | Body Control Unit (BCU) |
| 14 | 15 | Direction indicators |
| Hazard lights | ||
| 15 | 15 | Active cornering enhancement (ACE) |
| 16 | 10 | Horn |
Under-seat fuses
Two identical small fuse blocks are situated one beneath each front seat.
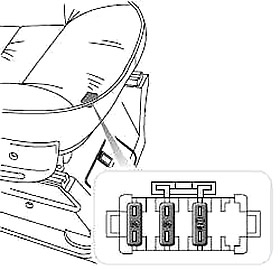
| № | A | Circuit protected |
|---|---|---|
| 1 | 40 | Seat electrics |
| 2 | 3 | Lumbar support - pump |
| 3 | 3 | Lumbar support - solenoid |
Advertisements