
Advertisements
Fuse box diagram (fuse layout), location and assignment of fuses and relays Chevrolet HHR (2006, 2007, 2008, 2009, 2010, 2011).

Checking and Replacing Fuses
The wiring circuits in your vehicle are protected from short circuits by a combination of fuses, circuit breakers, and fusible thermal links. This greatly reduces the chance of damage caused by electrical problems.
Look at the silver-colored band inside the fuse. If the band is broken or melted, replace the fuse. Be sure you replace a bad fuse with a new one of the identical size and rating.
If you ever have a problem on the road and do not have a spare fuse, you can “borrow” one that has the same amperage. Just pick some feature of your vehicle that you can get along without – like the radio or cigarette lighter – and use its fuse if it is the correct amperage. Replace it as soon as you can.
There are two fuse blocks in your vehicle: the floor console fuse block it the passenger compartment and the engine compartment fuse block.
Note
- Before replacing a fuse check that the key has been removed from the ignition and that all the services are switched off and/or disengaged.
- Do not repair fuses and never replace a blown fuse with one that has a higher amp rating. This can cause damage to the electrical system and fire.
- Never replace a broken fuse with anything other than a new fuse. Use always an intact fuse of the same color.
- If a fuse blows again contact a qualified service center.
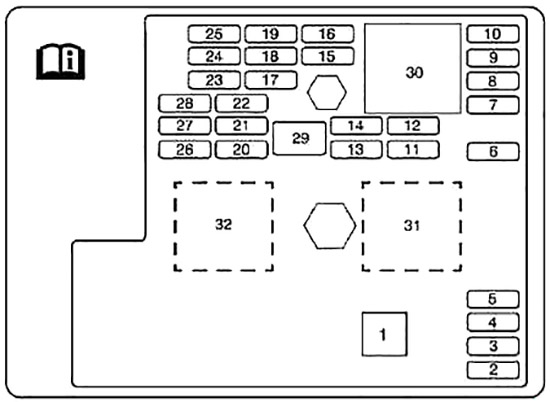
Floor Console Fuse Box Diagram
The floor console fuse block is located on the passenger’s side of the floor console behind the forward panel. The panel has four clips, one in each corner. Pull the panel to disconnect the four clips, and access the fuses. Use the fuse puller to remove fuses.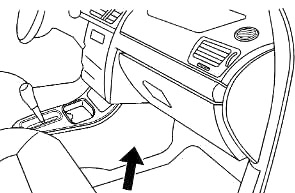
| № | Usage |
|---|---|
| 1 | Fuse Puller |
| 2 | Empty |
| 3 | Empty |
| 4 | Empty |
| 5 | Empty |
| 6 | Amplifier |
| 7 | Cluster |
| 8 | Ignition Switch, PASS-Key® III+ |
| 9 | Stoplamp |
| 10 | Heating, Ventilation, Air Conditioning, PASS-Key® III+ |
| 11 | Empty |
| 12 | Spare |
| 13 | Airbag |
| 14 | Spare |
| 15 | Windshield Wiper |
| 16 | Climate Control System, Ignition |
| 17 | Window Retained Accessory Power |
| 18 | Empty |
| 19 | Electric Power Steering, Steering Wheel Control |
| 20 | Sunroof |
| 21 | Spare |
| 22 | Empty |
| 23 | Audio System |
| 24 | XM Radio™, OnStar™ |
| 25 | Engine Control Module, Transmission Control Module |
| 26 | Door Locks |
| 27 | Interior Lights |
| 28 | Steering Wheel Control Illumination |
| 29 | Power Windows |
| 30 | Climate Control System |
| 31 | Empty |
| 32 | Retained Accessory Power (RAP) |
Advertisements
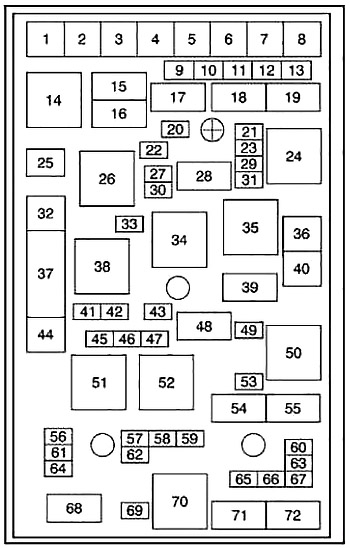
Engine Compartment Fuse Box Diagram
Lift the cover to access the fuse/relay block.
| № | Usage |
|---|---|
| 1 | Electric Power Steering |
| 2 | Rear Defogger |
| 3 | Empty |
| 4 | Body Control Module 3 |
| 5 | Starting System |
| 6 | Body Control Module 2 |
| 7 | Rear Power Plug (Panel Van Only), Cooling Fan (SS only) |
| 8 | Empty |
| 9 | Air Conditioning Clutch Diode |
| 10 | Liftgate, Sunroof |
| 11 | Empty |
| 12 | Rear Power Outlet (Panel Van Only) |
| 13 | Fuel Pump |
| 20 | Rear Wiper |
| 21 | Mirror |
| 22 | Air Conditioning |
| 23 | Heated Seats (Option) |
| 25 | Fuse Puller |
| 27 | Empty |
| 29 | Cigarette Lighter |
| 30 | Power Outlet |
| 31 | Daytime Running Lamps |
| 32 | Empty |
| 33 | Emissions |
| 36 | Power Windows (Turbo Only) |
| 37 | Power Seat (Option) |
| 40 | Cooling Fan |
| 41 | Engine Control Module |
| 42 | Cam Phaser (Turbo Only) |
| 43 | Engine Control Module, Transmission |
| 44 | Antilock Brake System (Option) |
| 45 | Injectors, Ignition Module |
| 46 | Backup Lamps |
| 47 | Heated Seat (Option) |
| 49 | Windshield Washer Pump |
| 53 | Fog Lamps (Option) |
| 56 | Sensing and Diagnostic Module (SDM) |
| 57 | Antilock Brake System (Option) |
| 58 | Windshield Wiper Diode |
| 59 | Windshield Wiper |
| 60 | Horn |
| 61 | Antilock Brake System (Option) |
| 62 | Instrument Panel, Ignition |
| 63 | Driver Side High-Beam |
| 64 | Canister Vent |
| 65 | Driver Side Low-Beam |
| 66 | Passenger Side Low-Beam |
| 67 | Passenger Side High-Beam |
| 69 | Parking Lamps |
| 14 | Rear Defogger Relay |
| 15 | Air Conditioning Clutch |
| 16 | Empty |
| 17 | Rear Wiper |
| 18 | Liftgate Release |
| 19 | Fuel Pump |
| 24 | Empty |
| 26 | Powertrain |
| 28 | Daytime Running Lamps |
| 34 | Starting System |
| 35 | Empty |
| 38 | Empty |
| 39 | Windshield Washer Pump |
| 48 | Rear Windshield Washer |
| 50 | Cooling Fan |
| 51 | Run, Crank |
| 52 | Windshield Wiper |
| 54 | Fog Lamps (Option) |
| 55 | Horn |
| 68 | Parking Lamps |
| 70 | Windshield Wipers |
| 71 | Headlamp Low-Beam |
| 72 | Headlamp High-Beam |
Additional fuses and relays
- An OnStar mini-fuse is located near the battery in the rear of the vehicle.
- A Center High-Mounted Stoplamp Relay, and a Rear Access Panel Door Interlock Relay (Panel Van only), are located underhood in front of the left shock tower.
- The Left Rear Access Panel Door Relay (Panel Van Only), and the Right Rear Access Panel Door Relay (Panel Van Only) are located in the rear of the vehicle behind the right rear quarter trim panel.
- A Rear Power Plug mini fuse (Panel Van Only) is located near the battery in the rear of the vehicle.
Advertisements